
2023 Guide to the PULSECHAIN BRIDGE | Full Tutorial
- CRYPTOGRFX

- Apr 8, 2023
- 6 min read
It is Official, the Pulsechain Testnet Bridge is finally live and ready for us all to practice moving funds to the Pulsechain before Mainnet inevitably goes live. After much testing, it works flawlessly, and seems faster than the previous version that we had during V2B. More importantly though, there are many steps that we need to discuss so that you understand and feel comfortable utilizing the bridge. In this write up, we will cover everything you need to know to practice before launch including all links that you will need.
Before we get started, I want to frame what we are doing here in a way that is directly applicable to launch, and not have any misconceptions between actions/steps taken now versus when Mainnet launches. There can be numerous extra steps that can be taken, based on which test tokens you wish to utilize, as we will be using a fake Ethereum called 'Sepolia', but not all of these extra steps will apply. You will already have the tokens you wish to bridge over to Pulsechain in your wallet on the Ethereum network, so the first number of steps that include getting test ETH or test Stablecoin (tDAI) before bridging are only applicable to testnet. Once Pulsechain actually goes live, there will only be a few steps to take.
Now that we've cleared the air, let's get started!
The Bridge - Pulseramp and Connecting to Sepolia Testnet
First off, we need to go to the Pulseramp bridge to connect to our wallet to the Sepolia Testnet. go to the link here to go to the bridge: https://pulseramp.com/#/bridge
Once you have arrived, you may have noticed that there is a "connect wallet" button at the top right of your screen, and there is the center interface which will allow you to bridge your tokens. Initially, we need to connect to the Sepolia testnet, so we are then able to go and get our test tokens in the form of ETH and tDAI. Click the connect wallet button at the top of the screen. This should prompt your metamask to open and request you to approve switching networks to 'Sepolia'.
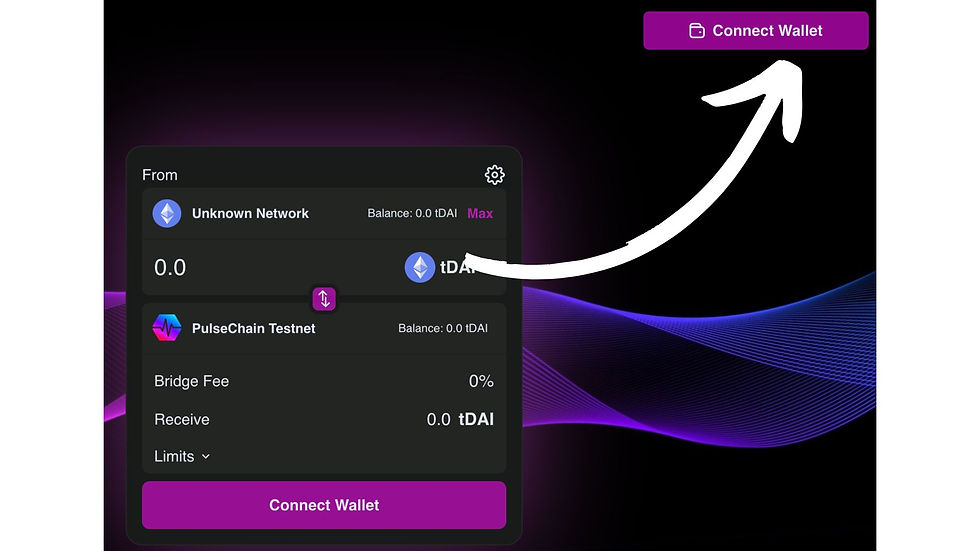
If this isnt the case and it tries to switch you to Pulsechain's V3 Testnet, allow your wallet to connect and then hit the arrows highlighted in the photo below to switch networks to the Sepolia Testnet. Be sure to approve the network switch, and once completed you will see "Sepolia Testnet" in the "From" section at the top of the interface.
Getting Test ETH
There are two main pathways to getting Test ETH tokens: through an alchemy website which requires you to input an email address, or an email free experience which requires you to "Mine" the Test ETH yourself. The Alchemy process gets you 1 test ETH nearly instantly, whereas the "Mining" takes much longer to obtain even 0.01
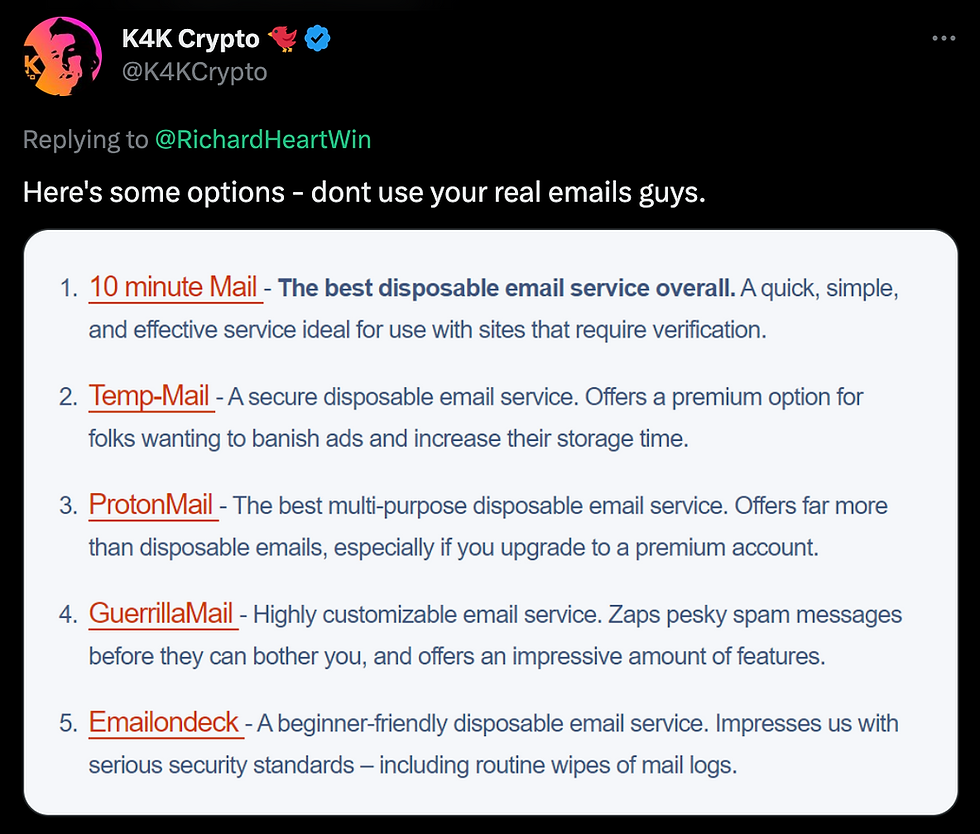
ETH. It should be noted here that the minimum ETH that can be sent across the bridge is 0.018 ETH, so you will have to wait until the mining process has accumulated at least that much before sending it to your wallet. Before I give you the links to either page, I want to place the disclaimer out there that if you do choose to use the Alchemy route, the best practice is to use an email "burner" address and not your main personal email. Here are a list from K4K Crypto that you can choose from to create a free "Burner" email.
Let's cover the Alchemy route first. To get 1 Test ETH from Alchemy, you must create an account, then paste your address into the bar at the link here: https://sepoliafaucet.com/ . This is also the link that you can create an Alchemy account with.
Once you have done that, you can send the ETH to your wallet. You should see it arrive shortly! The alternative route which does not require an email, but instead requires time, go to this link and simply input your wallet address to begin getting Test ETH: https://sepolia-faucet.pk910.de/ . Again, the minimum amount that can be sent across the bridge is 0.018 ETH, so you must allow the mining process to accumulate at least that much before sending it to your wallet. For anyone that books a coaching call for help navigating the bridge, I will send you the Test ETH you need if you do not want to participate in this part of the process yourself. Additionally, there are Test Stablecoins that can be sent to your wallet which we will not cover in this write up but will be included in the video at the bottom of this write up as well. A link to booking will be at the end of this write-up with a discounted coupon code.
It's Time to Bridge!
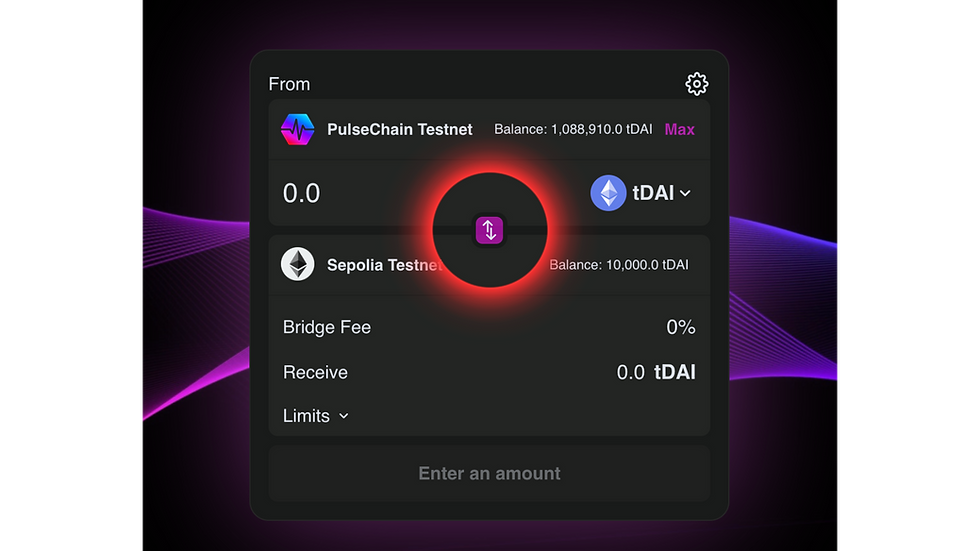
Once you have received your test ETH, it is time to go back to the bridge at https://pulseramp.com/#/bridge . Be sure that your wallet is connected and you are connected to the Sepolia network, to send to the Pulsechain Testnet. Now, type in the amount of ETH you wish to send over the bridge, click "Send" and approve the final few steps that will pop up automatically on screen. Once this is complete, you should see that it now shows an amount of WETH in your Pulsechain balance on the interface.

Now that you've completed this, its time to switch back to the Pulsechain Testnet and add WETH to our wallet. To do this, click on the arrow in the middle of the image above. If this does not work for whatever reason, go into your wallet and manually switch to the Puslechain Testnet. If you have never connected to the Pulsechain testnet, you can add the network to you wallet by going to https://pulsechain.com/ and adding the network to your wallet using the RPC settings on the home page. Click the Network dropdown menu and select "Add Network" to input the settings.
Adding WETH to your wallet
Now, this process will be far easier when Mainnet is live, as the test tokens have obscure addresses that you have to fetch for yourself on the block explorer, so to save you the trouble of going through the search process, here is the address to add WETH into your wallet: 0xE7C19bC6f794046574D9A317354Ab03ce725A802
If you are unfamiliar with this process, here is a quick overview. Go into your metamask on the Pulsechain Testnet, and click "Import Tokens" at the bottom of your wallet. Simply paste in the address above and you should see your WETH Balance in your wallet.
Next, to swap WETH for anything on the PulseX Exchange, go to https://app.v3.testnet.pulsex.com/swap?chain=pulsechain and click on the top token in the swap interface. When the window pops up that allows you to select a new token to swap, paste in the same address in the search bar, click "Import", followed by the little check box at the bottom left of the next window and "Accept". You should now be able to swap your WETH for anything on the Pulsechain Testnet!
Conclusion
Congratulations! You have officially learned how to bridge your ETH over to Pulsechain. It is important to remember that this process on testnet is a little more lengthy and challenging than it will be when Mainnet goes live, so if you are feeling overwhelmed by the many steps, just remember that Mainnet will be a breeze in comparison. Like I outlined above, there will be a video up for this on my youtube channel very soon, with additional walkthroughs including getting test stablecoins (tDAI) and bridging them over as well for those who want more test tokens to play with; as Sepolia ETH is limited to one per 24 hour period. The link to my Youtube channel can be found here: https://www.youtube.com/@CRYPTOGRFX or at the bottom of this write up. If you want to bypass all of the more complicated steps and be guided through this process one on one, as well as cut down the time it takes to get all of this set up, I recommend booking a one on one Coaching call to get a bespoke lesson and walkthrough in addition to cutting down the steps involved. Use coupon code PUSECHAIN369 for 36.9% off my one hour calls and PLS222 for 22.2% off the 30 minute calls.


Comments